This is part of series Building a homelab, where I document my journey to build my own homelab with Kubernetes.
- Creating a Kubernetes cluster with Talos Linux
- Setting up Argo CD
Up until now, I have had some experiences with self-hosting services. However, as I learned more, I could see ways to make my setup better.
While learning about Kubernetes, I thought it could be used to host everything that I have self-hosted so far. If I could get it right, it would allow me to manage all the services while also reducing costs.
The plan
The goal is to build a homelab, if it was not obvious from the title. A Kubernetes cluster is to be set up, where all the services I am currently hosting will reside.
My current set of hosts using NixOS is described in the following topology (using nix-topology):

The Dell XPS 13, which I have previously used to run Kubernetes that is no longer active, was to be utilised again for this project. Once I get the cluster and services set up and running, I may consider letting the Raspberry Pi join the cluster (after migrating PeerTube that I have hosted there, of course).
For all the “cloud” services, I hope to eventually reduce my reliance to them by ultimately making Backblaze the only dependency (for their object storage).
Running Kubernetes with Talos Linux
The next thing to consider was the operating system Kubernetes will run on. I have used NixOS for this in the past, but it was (to me) complicated to configure and was designed to do much more than simply running the container orchestration system, which I realised after being aware of the operating system I will soon mention.
Talos is a modern OS for running Kubernetes: secure, immutable, and minimal. Talos is fully open source, production-ready, and supported by the people at Sidero Labs. All system management is done via an API - there is no shell or interactive console. Benefits include:
- Security: Talos reduces your attack surface: It’s minimal, hardened, and immutable. All API access is secured with mutual TLS (mTLS) authentication.
- Predictability: Talos eliminates configuration drift, reduces unknown factors by employing immutable infrastructure ideology, and delivers atomic updates.
- Evolvability: Talos simplifies your architecture, increases your agility, and always delivers current stable Kubernetes and Linux versions.
From what I could find among the list of purpose-built operating systems for Kubernetes, Talos Linux seemed to be the best fit for my use case. Bottlerocket exists, which can be used to set up my own Elastic Kubernetes Service (EKS) cluster using EKS Anywhere, but I did not see any particular benefit in integrating with Amazon’s Kubernetes distribution that will justify its somewhat steeper hardware requirements compared to the ones for Talos Linux. Developers of the latter compared two operating systems in their blog post; the small number of binaries in their system, in my mind, correlated to reduced attack surface compared to general-purpose Linux distributions like, say, NixOS and Debian.
Another thing about Talos Linux was that it could seemingly be declaratively configured. I had to find out how it does so compared to NixOS, but it still sounded nice on the surface.
Operating hybrid clusters with Tailscale
Tailscale became an essential part of my infrastructure since the day I used it to set up my PeerTube instance, and this time, I was about to take it to the next level. My ideal setup was for the nodes to communicate through the private network, while eliminating geographical boundaries that may be introduced by changes to the cluster.
However, ever since I started tinkering with Kubernetes, I could not figure out how to implement this ideal setup. Before I started implementing this setup, I initially thought Tailscale’s Kubernetes operator would do the trick; however, it was apparently far from what the operator was designed to do.
For now, I decided to integrate Tailscale both on the OS level and with the Kubernetes operator. In the meantime, I found something named KubeSpan.
KubeSpan is a feature of Talos that automates the setup and maintenance of a full mesh WireGuard network for your cluster, giving you the ability to operate hybrid Kubernetes clusters that can span the edge, datacenter, and cloud. Management of keys and discovery of peers can be completely automated, making it simple and easy to create hybrid clusters.
KubeSpan consists of client code in Talos Linux, as well as a discovery service that enables clients to securely find each other. Sidero Labs operates a free Discovery Service, but the discovery service may, with a commercial license, be operated by your organization and can be downloaded here.
If I understood things correctly, it meant that I can use KubeSpan to help my nodes form a cluster. Since I will be starting with a one-node cluster for now, I decided to come back and learn more about it when I introduce a new one.
Declarative cluster provisioning with OpenTofu
One thing I struggled with Kubernetes in the past was figuring out how I can configure its environment (and not just its deployments) declaratively. Being heavily inspired by the reproducible environment NixOS provides, I wanted to see if I can apply it to my cluster. However, after my not-so-successful journey that I have previously documented, the container orchestration system and the declarative operating system just did not seem to mix well together.
I wished to use Helm package manager due to its ease of use, but forcing it the NixOS way brought me a considerable amount of headache. Even if I manage to do it, I will need to think about how charts should be updated later on. After a significant amount of trying, including setting up Talhelper, I eventually settled on a method that I felt was the cleanest way.
OpenTofu is a reliable, flexible, community-driven infrastructure as code tool under the Linux Foundation’s stewardship. It serves as a drop-in replacement for Terraform, preserving your existing workflows and configurations.
I have previously expressed my wish to keep my code interoperable with both Terraform and OpenTofu, but in this particular case, I decided not to bother with the former. This move was due to the open-source variant’s ability to encrypt its state, which is technically possible but pretty limited with Terraform.
Storing your state remotely can provide better security by letting you encrypt your state when it’s at rest. For example, the following backends support state encryption:
- HCP Terraform encrypts state at rest, lets you supply your own encryption keys, and protects state with TLS in transit
- The S3 backend can encrypt state at rest if you enable the
encryptoption, and protects state with TLS in transit- The GCS backend supports using customer-supplied or customer-managed encryption keys
The Talos provider would set up the cluster using provisioned secrets (with the Tailscale provider, for example). The Helm provider would then install charts needed to achieve the desired initial state of my cluster.
Addressing potential hardware issues
Before delving into the Kubernetes world, however, I was concerned about a few issues that could potentially damage the laptop to run the cluster with.
The thermal issue
The first issue I was reminded of was the age of the laptop. Although I do not believe it saw a lot of heavy workloads during its ten-year life so far, I thought it could now struggle once they are introduced.
To find out if I need to make changes to the hardware, I used lm_sensors to measure this device’s thermal performance. By running sensors-detect and answering default values at each prompt by simply pressing Enter, except the last one where I said YES to generating /etc/sysconfig/lm_sensors, I was ready to monitor the temperatures.
[lyuk98@xps13:~]$ nix shell nixpkgs#lm_sensors
[lyuk98@xps13:~]$ sudo sensors-detect
# sensors-detect version 3.6.2
# System: Dell Inc. XPS 13 9350 (laptop)
# Board: Dell Inc. 07TYC2
# Kernel: 6.12.63 x86_64
# Processor: Intel(R) Core(TM) i5-6200U CPU @ 2.30GHz (6/78/3)

This program will help you determine which kernel modules you need
to load to use lm_sensors most effectively. It is generally safe
and recommended to accept the default answers to all questions,
unless you know what you're doing.

Some south bridges, CPUs or memory controllers contain embedded sensors.
Do you want to scan for them? This is totally safe. (YES/no):
Module cpuid loaded successfully.
Silicon Integrated Systems SIS5595...                       No
VIA VT82C686 Integrated Sensors...                          No
VIA VT8231 Integrated Sensors...                            No
AMD K8 thermal sensors...                                   No
AMD Family 10h thermal sensors...                           No
AMD Family 11h thermal sensors...                           No
AMD Family 12h and 14h thermal sensors...                   No
AMD Family 15h thermal sensors...                           No
AMD Family 16h thermal sensors...                           No
AMD Family 17h thermal sensors...                           No
AMD Family 15h power sensors...                             No
AMD Family 16h power sensors...                             No
Hygon Family 18h thermal sensors...                         No
AMD Family 19h thermal sensors...                           No
Intel digital thermal sensor...                             Success!
    (driver `coretemp')
Intel AMB FB-DIMM thermal sensor...                         No
Intel 5500/5520/X58 thermal sensor...                       No
VIA C7 thermal sensor...                                    No
VIA Nano thermal sensor...                                  No

Some Super I/O chips contain embedded sensors. We have to write to
standard I/O ports to probe them. This is usually safe.
Do you want to scan for Super I/O sensors? (YES/no):
Probing for Super-I/O at 0x2e/0x2f
Trying family `National Semiconductor/ITE'...               No
Trying family `SMSC'...                                     Yes
Found unknown chip with ID 0x1d00
Probing for Super-I/O at 0x4e/0x4f
Trying family `National Semiconductor/ITE'...               No
Trying family `SMSC'...                                     No
Trying family `VIA/Winbond/Nuvoton/Fintek'...               No
Trying family `ITE'...                                      No

Some hardware monitoring chips are accessible through the ISA I/O ports.
We have to write to arbitrary I/O ports to probe them. This is usually
safe though. Yes, you do have ISA I/O ports even if you do not have any
ISA slots! Do you want to scan the ISA I/O ports? (YES/no):
Probing for `National Semiconductor LM78' at 0x290...       No
Probing for `National Semiconductor LM79' at 0x290...       No
Probing for `Winbond W83781D' at 0x290...                   No
Probing for `Winbond W83782D' at 0x290...                   No

Lastly, we can probe the I2C/SMBus adapters for connected hardware
monitoring devices. This is the most risky part, and while it works
reasonably well on most systems, it has been reported to cause trouble
on some systems.
Do you want to probe the I2C/SMBus adapters now? (YES/no):
Using driver `i2c-i801' for device 0000:00:1f.4: Sunrise Point-LP (PCH)
Module i2c-dev loaded successfully.

Next adapter: SMBus I801 adapter at f040 (i2c-0)
Do you want to scan it? (YES/no/selectively):

Next adapter: i915 gmbus dpc (i2c-1)
Do you want to scan it? (yes/NO/selectively):

Next adapter: i915 gmbus dpb (i2c-2)
Do you want to scan it? (yes/NO/selectively):

Next adapter: i915 gmbus dpd (i2c-3)
Do you want to scan it? (yes/NO/selectively):

Next adapter: Synopsys DesignWare I2C adapter (i2c-4)
Do you want to scan it? (YES/no/selectively):
Adapter doesn't support all probing functions.
Some addresses won't be probed.

Next adapter: AUX A/DDI A/PHY A (i2c-5)
Do you want to scan it? (yes/NO/selectively):

Next adapter: AUX B/DDI B/PHY B (i2c-6)
Do you want to scan it? (yes/NO/selectively):

Next adapter: AUX C/DDI C/PHY C (i2c-7)
Do you want to scan it? (yes/NO/selectively):

Next adapter: Synopsys DesignWare I2C adapter (i2c-8)
Do you want to scan it? (YES/no/selectively):
Adapter doesn't support all probing functions.
Some addresses won't be probed.
Client at address 0x2c can not be probed - unload all client drivers first!


Now follows a summary of the probes I have just done.
Just press ENTER to continue:

Driver `coretemp':
  * Chip `Intel digital thermal sensor' (confidence: 9)

Do you want to generate /etc/sysconfig/lm_sensors? (yes/NO): YES
Copy prog/init/lm_sensors.init to /etc/init.d/lm_sensors
for initialization at boot time.
You should now start the lm_sensors service to load the required
kernel modules.

Unloading i2c-dev... OK
Unloading cpuid... OK
Running sensors printed temperatures at the time I ran the command, which indicated that the device is pretty cool at the moment.
[lyuk98@xps13:~]$ sensors
dell_smm-isa-00de
Adapter: ISA adapter
Processor Fan:    0 RPM  (min =    0 RPM, max = 4900 RPM)
CPU:            +27.0°C
Ambient:        +26.0°C
Other:          +27.0°C
Other:          +26.0°C
SODIMM:         +25.0°C
pwm1:                0%

acpitz-acpi-0
Adapter: ACPI interface
temp1:        +25.0°C
temp2:        +27.8°C
temp3:        +29.8°C

nvme-pci-3c00
Adapter: PCI adapter
Composite:    +23.9°C

coretemp-isa-0000
Adapter: ISA adapter
Package id 0:  +27.0°C  (high = +100.0°C, crit = +100.0°C)
Core 0:        +25.0°C  (high = +100.0°C, crit = +100.0°C)
Core 1:        +25.0°C  (high = +100.0°C, crit = +100.0°C)

pch_skylake-virtual-0
Adapter: Virtual device
temp1:        +26.0°C
It was all about to change, though, as I prepared to run an intensive task.
[lyuk98@xps13:~]$ nix shell nixpkgs#wget nixpkgs#unzip nixpkgs#ffmpeg
[lyuk98@xps13:~]$ cd $(mktemp --directory)
[lyuk98@xps13:/tmp/tmp.UCGgcM1cOh]$ wget https://download.blender.org/demo/movies/BBB/bbb_sunflower_2160p_60fps_normal.mp4.zip
[lyuk98@xps13:/tmp/tmp.UCGgcM1cOh]$ unzip bbb_sunflower_2160p_60fps_normal.mp4.zip
First, I started monitoring the temperatures in a different shell.
[lyuk98@xps13:~]$ watch --differences --no-title sensors
Then, with FFmpeg, I re-encoded the downloaded video to AV1, which I thought was the kind of intensive task the device will be subject to.
[lyuk98@xps13:/tmp/tmp.UCGgcM1cOh]$ ffmpeg -i bbb_sunflower_2160p_60fps_normal.mp4 \
  -c:v libsvtav1 \
  -c:a copy \
  output.mkv
The process took about 63 minutes, which was much longer than 14 minutes my Framework Laptop 13 took to do the same thing. I guess six years of generation gap does make a lot of difference.
The fan started running after a minute at about mid-80°C mark, which subsequently kept the system at around low-to-mid 70 degrees Celsius at first. The temperature gradually rose, though, and after about 50 minutes, it did reach as high as 81 degrees Celsius. It did not get any warmer than that, however, and finishing the task rapidly dropped the temperature to about 45 degrees Celsius, where the fan stopped.
dell_smm-isa-00de
Adapter: ISA adapter
Processor Fan: 3620 RPM  (min =    0 RPM, max = 4900 RPM)
CPU:            +76.0°C
Ambient:        +41.0°C
Other:          +32.0°C
Other:          +54.0°C
SODIMM:         +48.0°C
pwm1:               64%

acpitz-acpi-0
Adapter: ACPI interface
temp1:        +25.0°C
temp2:        +27.8°C
temp3:        +29.8°C

nvme-pci-3c00
Adapter: PCI adapter
Composite:    +31.9°C

coretemp-isa-0000
Adapter: ISA adapter
Package id 0:  +76.0°C  (high = +100.0°C, crit = +100.0°C)
Core 0:        +76.0°C  (high = +100.0°C, crit = +100.0°C)
Core 1:        +75.0°C  (high = +100.0°C, crit = +100.0°C)

pch_skylake-virtual-0
Adapter: Virtual device
temp1:        +64.5°C
From what I could find online, this temperature range seemed to be fine. As a result, I did not proceed with the thermal paste replacement. It was a bit disappointing, though, as I had some PTM7950 left after applying it to my Framework Laptop 13.
The display problem
This computer was to be run at all times. However, due to the minimal nature of Talos Linux, the screen stayed on no matter what, and I could not figure out how to turn it off after some time of inactivity.
Aside from increased energy consumption for almost no benefit, I was worried that it could prematurely render the screen inoperable. To fix this potential issue, I decided to try disconnecting the display.
I could not find any guide from iFixit that does it; as a result, I ended up reading the laptop’s service manual.
After taking off the cover, I found and disconnected the part that says “Touch Screen.”
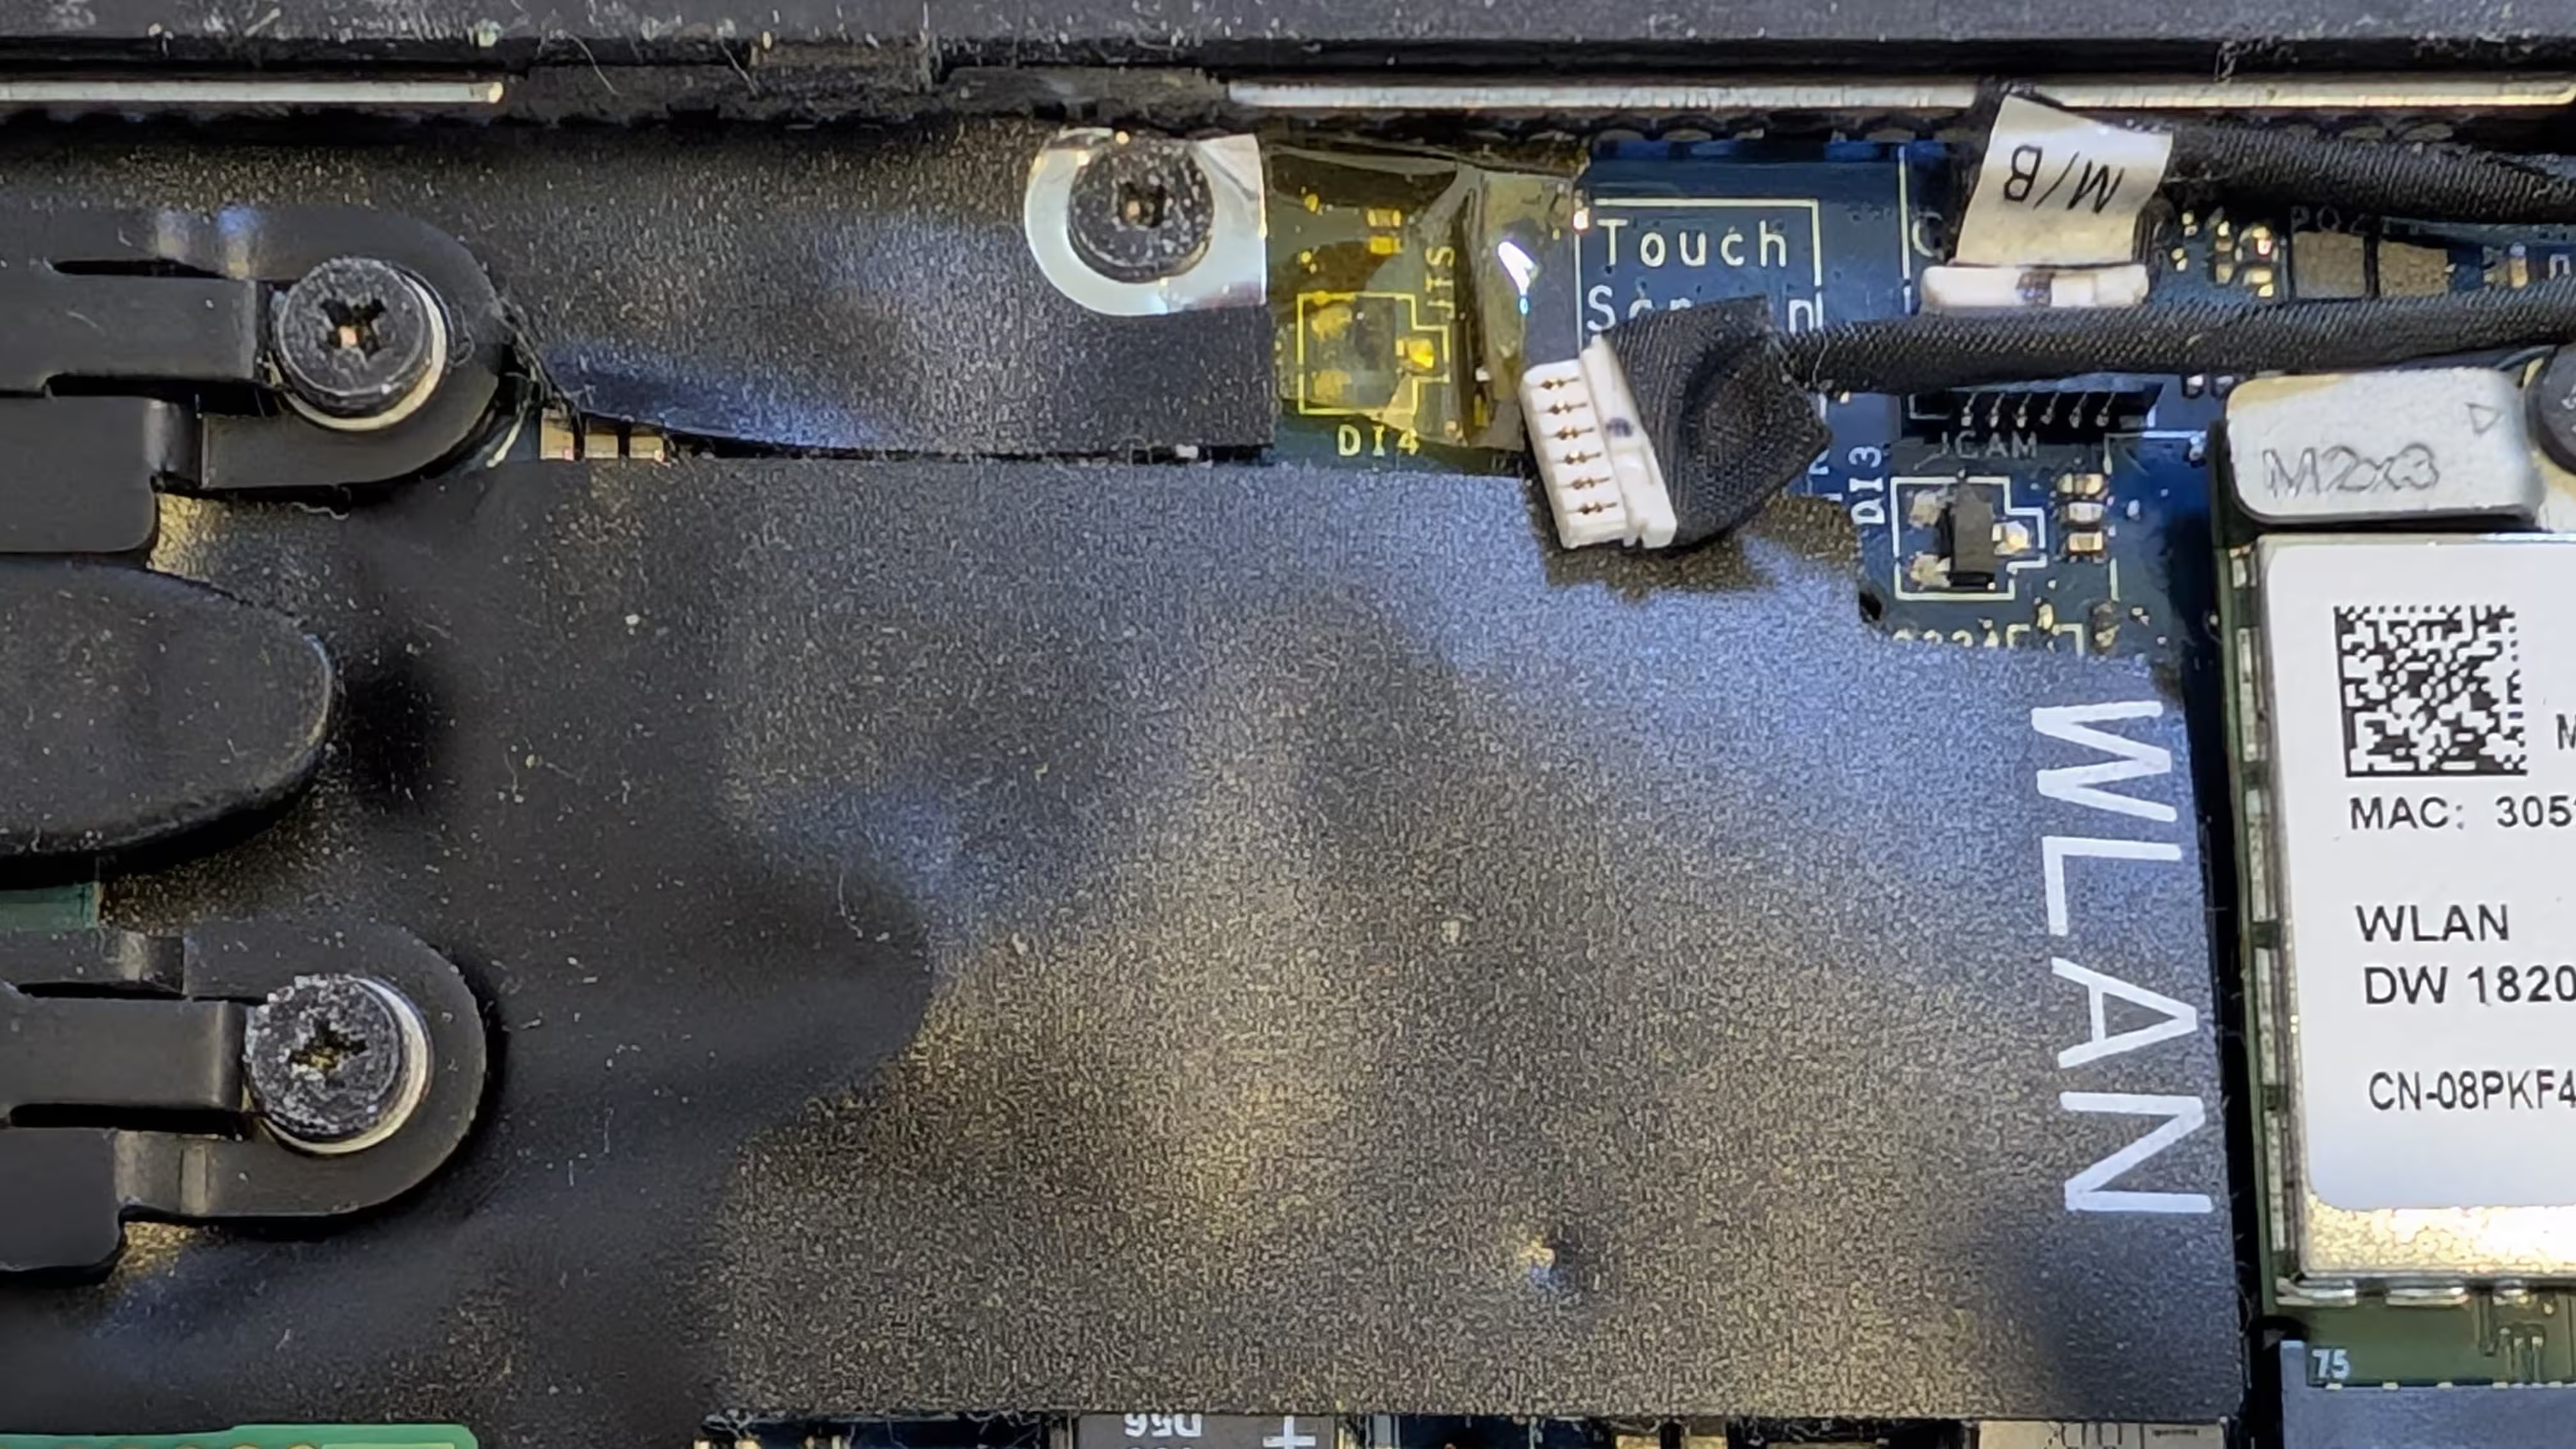
At first, I thought it was done, only to be surprised by the display still working. I seemingly only disabled the “touch” part of the screen; to disconnect the actual display, I opened up the laptop once more.
Between the fan and the SSD was where the cable was connected to.
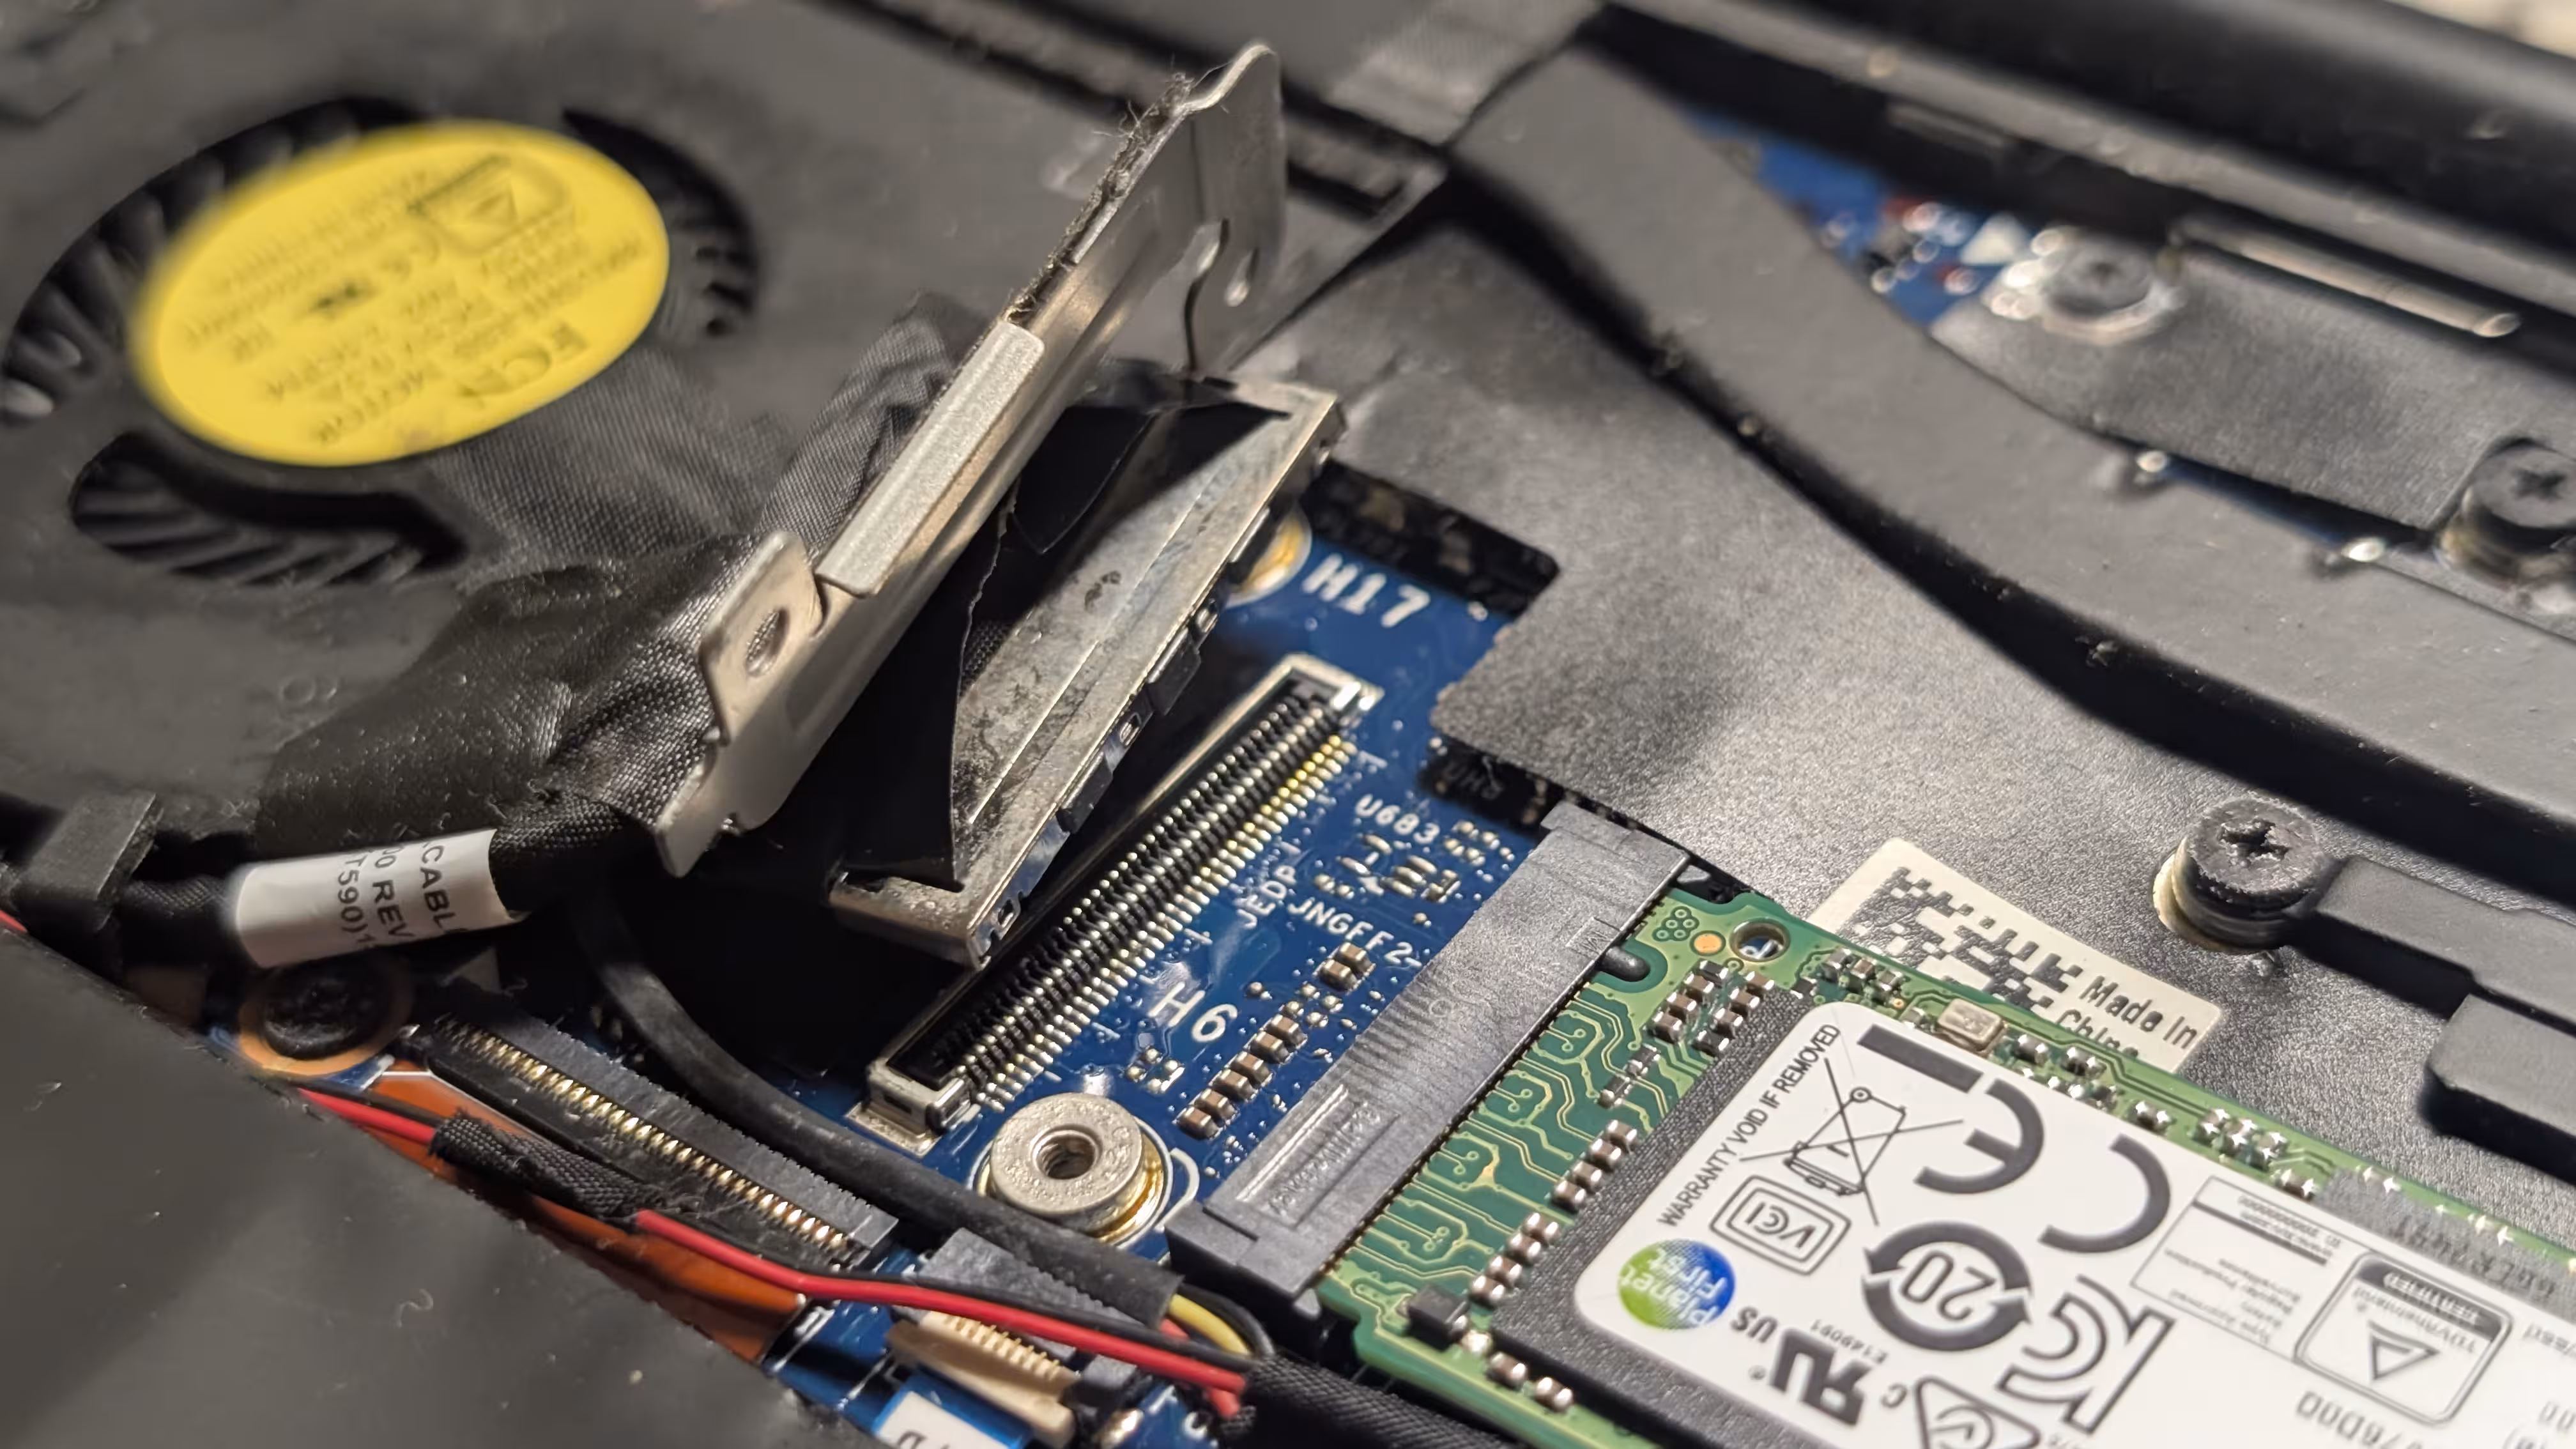
When it was disconnected, I tried turning the device on. However, something did not seem right; the laptop, after blinking twice in amber and seven times in white, just shut off. Based on what I could find afterwards, I realised that it was a result of “LCD failure” and that there was probably nothing I could do for it to be ignored.
As a result, I reconnected everything (except the battery that I have previously disconnected) again. Later on, I found a kernel parameter that would disable the display anyway, which I thought was a cleaner solution.
Preparing infrastructure
Before writing any code, I first prepared cloud providers. Previously, while working on my self-hosted Ente instance, I wrote bootstrapping configurations to create an environment for Terraform to do the actual provisioning with. I decided not to bother doing so this time, though, as it brought more confusion and complexity during the implementation.
Granting access to Tailscale
For this part, I focused on letting nodes join the tailnet, setting up the Kubernetes operator, and using it to access the control plane.
On top of existing ones, such as tag:ci, I created tags tag:k8s-operator and tag:k8s, as well as node-specific tags tag:k8s-control-plane and tag:k8s-worker, at the access control editor.
{
	// Define the tags which can be applied to devices and by which users.
	"tagOwners": {
		// Existing tags

		"tag:k8s-operator": ["autogroup:admin", "tag:ci"],
		"tag:k8s":          ["tag:k8s-operator"],

		// Control plane nodes in the Kubernetes cluster
		"tag:k8s-control-plane": ["autogroup:admin", "tag:ci"],

		// Worker nodes in the Kubernetes cluster
		"tag:k8s-worker": ["tag:k8s-control-plane", "tag:ci"],
	},
}
To utilise Tailscale’s subnet routers for pods and services, their IP ranges were set to be automatically approved.
{
	"autoApprovers": {
		"routes": {
			// The pod subnet CIDR (IPv4)
			"10.244.0.0/16": ["tag:k8s-control-plane"],

			// The pod subnet CIDR (IPv6)
			"fd00:10:244::/56": ["tag:k8s-control-plane"],

			// The service subnet CIDR (IPv4)
			"10.96.0.0/12": ["tag:k8s-control-plane"],

			// The service subnet CIDR (IPv6)
			"fd00:10:96::/112": ["tag:k8s-control-plane"],
		},
	},
}
I then created an OAuth credential for the OpenTofu workflow to do its thing. Because the tags tag:k8s-operator and tag:k8s-node are owned by tag:ci, I did not have to be overly specific in assigning one.
| General | Devices | Keys |
|---|---|---|
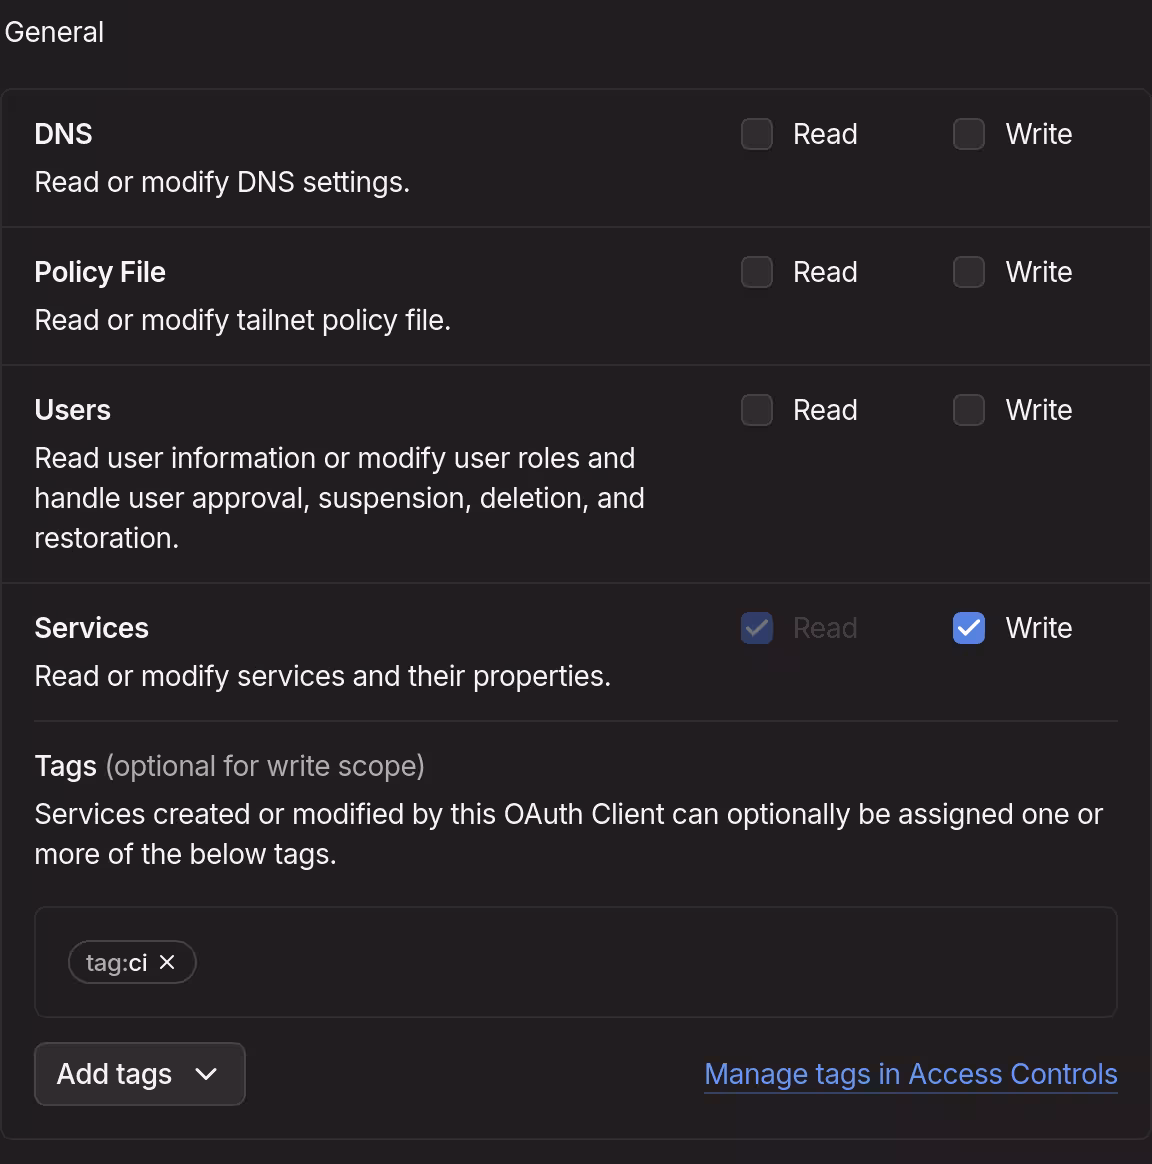 |
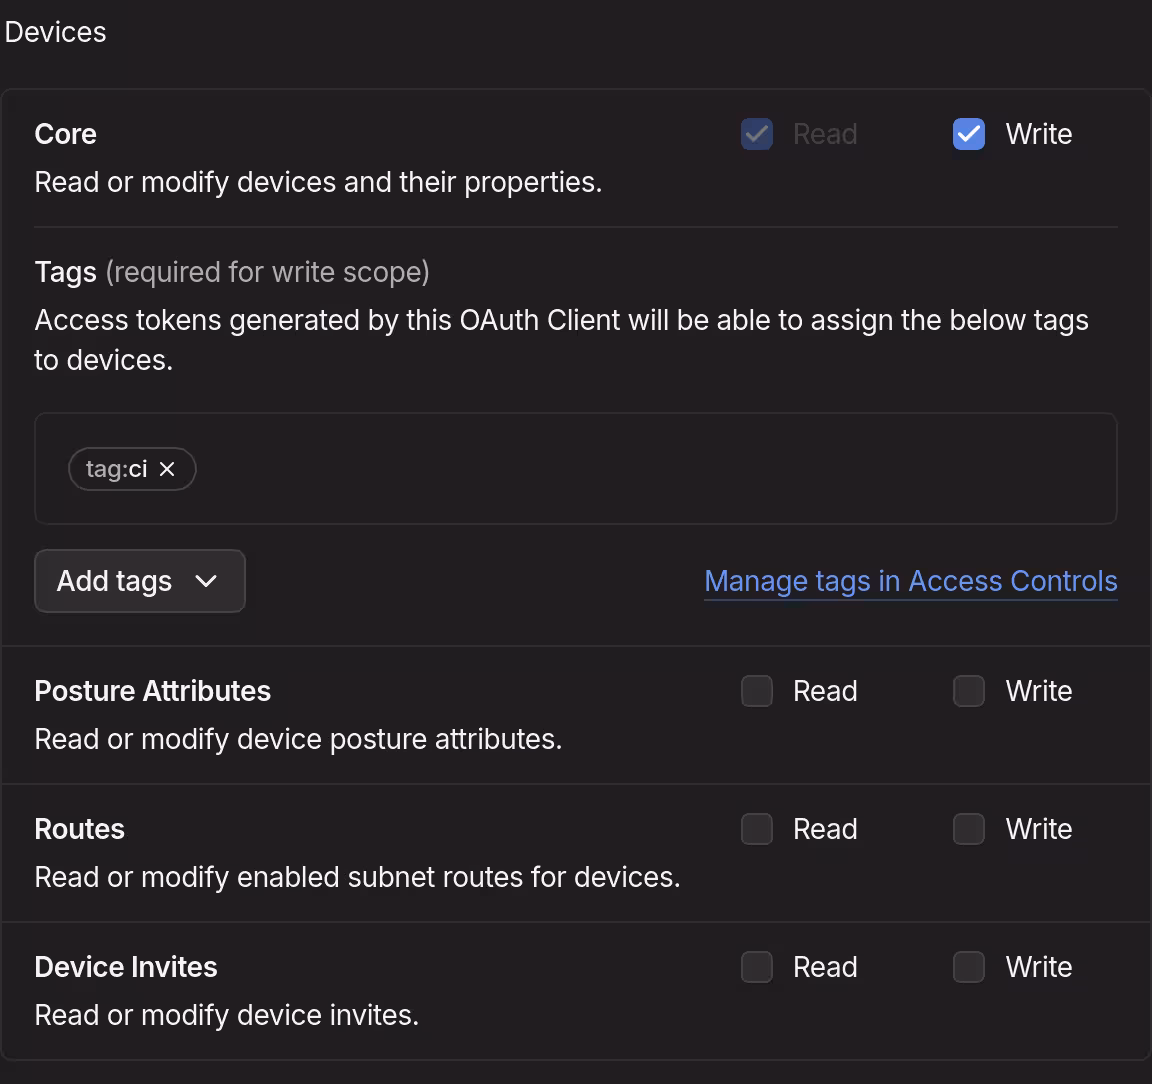 |
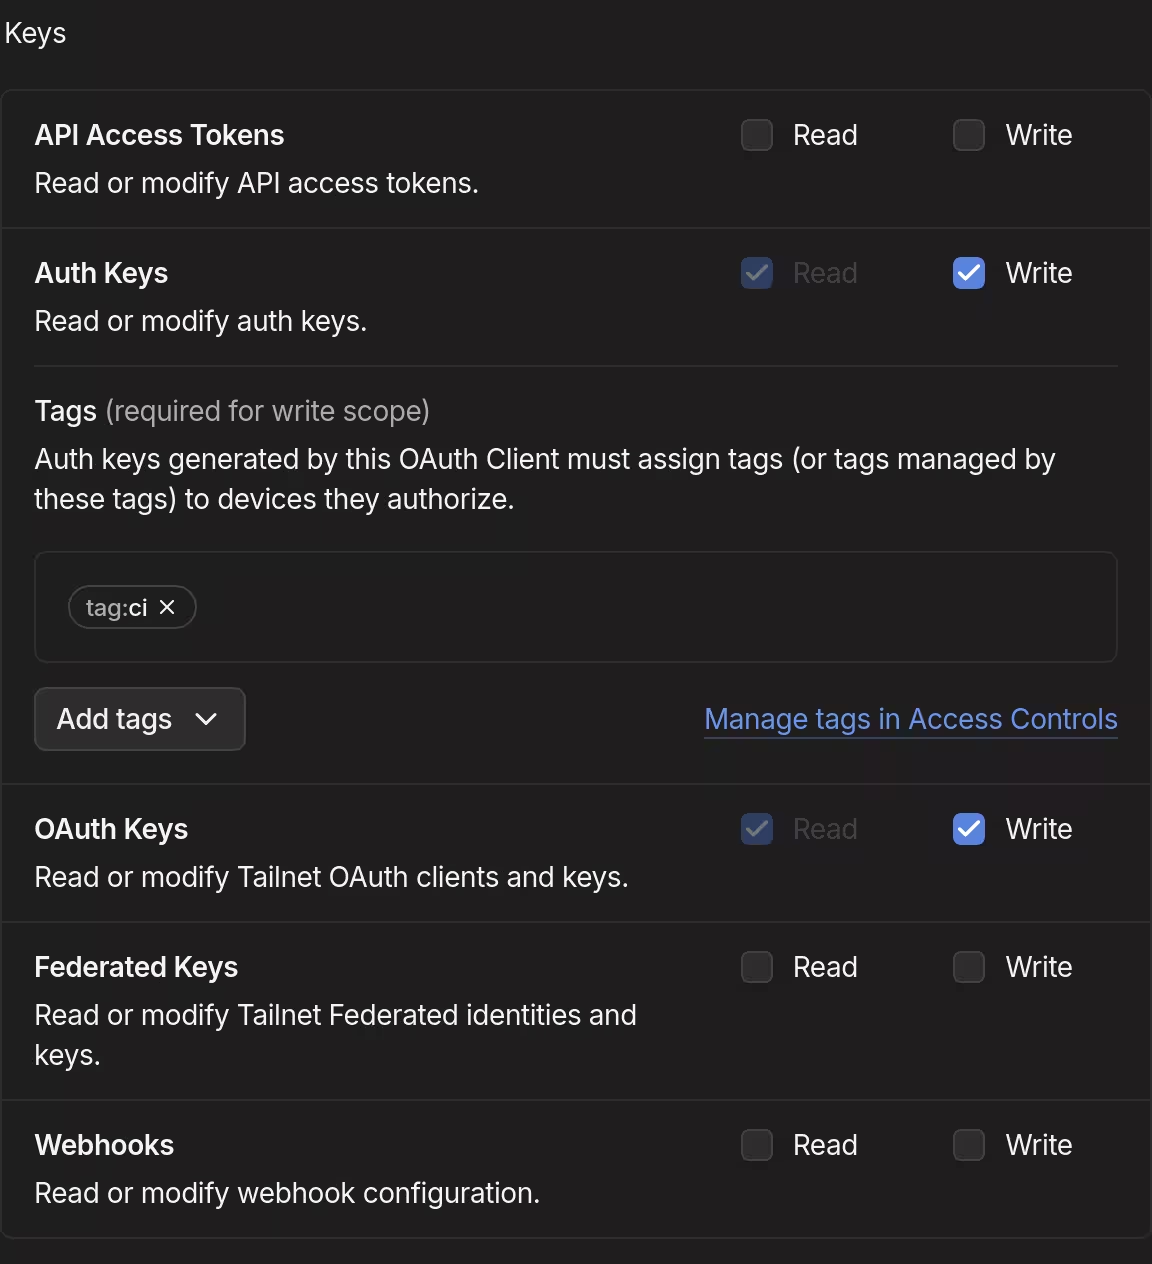 |
By setting up Tailscale’s API server proxy, in “auth mode” in particular, my identity in the tailnet could be used to impersonate specific Kubernetes roles.
- Auth mode: In auth mode, requests from the tailnet proxied over to the Kubernetes API server are additionally impersonated using the sender’s tailnet identity. Kubernetes RBAC can then be used to configure granular API server permissions for individual tailnet identities or groups.
To prepare for this on the Tailscale side, together with grants allowing access to ports used by Talos Linux and Kubernetes, I added following grants to the access control editor:
{
	"grants": [
		// Existing grants
		// Kubernetes API server
		{
			"src": ["*"],
			"dst": ["tag:k8s-control-plane"],
			"ip":  ["tcp:6443"],
		},
		// etcd server client API
		{
			"src": ["tag:k8s-control-plane"],
			"dst": ["tag:k8s-control-plane"],
			"ip":  ["tcp:2379", "tcp:2380"],
		},
		// Kubelet API
		{
			"src": ["tag:k8s-control-plane"],
			"dst": ["tag:k8s-control-plane", "tag:k8s-worker"],
			"ip":  ["tcp:10250"],
		},
		// kube-proxy
		{
			"src": ["tag:k8s-worker"],
			"dst": ["tag:k8s-worker"],
			"ip":  ["tcp:10256"],
		},
		// NodePort Services
		{
			"src": ["*"],
			"dst": ["tag:k8s-worker"],
			"ip":  ["tcp:30000-32767", "udp:30000-32767"],
		},
		// Talos Linux (apid)
		{
			"src": ["tag:k8s-control-plane", "tag:ci"],
			"dst": ["tag:k8s-control-plane", "tag:k8s-worker"],
			"ip":  ["tcp:50000"],
		},
		// Talos Linux (trustd)
		{
			"src": ["tag:k8s-worker"],
			"dst": ["tag:k8s-control-plane"],
			"ip":  ["tcp:50001"],
		},
		// Allow members with access to Kubernetes API server proxy
		{
			"src": ["autogroup:admin"],
			"dst": ["tag:k8s-operator"],
			"ip":  ["tcp:443"],
		},
		// Allow members with access to Kubernetes API server proxy devices
		{
			"src": ["autogroup:admin"],
			"dst": ["tag:k8s"],
			"ip":  ["tcp:80", "tcp:443"],
		},
		// Let administrators impersonate Kubernetes group system:masters
		{
			"src": ["autogroup:admin"],
			"dst": ["tag:k8s-operator"],
			"app": {
				"tailscale.com/cap/kubernetes": [{"impersonate": {"groups": ["system:masters"]}}],
			},
		},
	],
}
It meant that members of the tailnet group autogroup:admin can now act as system:masters in the Kubernetes cluster which, based on my understanding, was kind of like being root in Unix-like systems. I would have opted for fine-grained permissions under specific circumstances, but I felt this was good enough, given that I am the only administrator (and member) in my Tailscale network.
Finally, as one of the requirements to set up the API server proxy, I enabled HTTPS for my tailnet.
Preparing state storage with Backblaze B2
I have previously done this kind of thing before, so I went right in. A private bucket (which name is not actually opentofu-state-kubernetes) was first created using backblaze-b2.
[lyuk98@framework:~]$ backblaze-b2 bucket create \
  opentofu-state-kubernetes \
  allPrivate \
  --default-server-side-encryption SSE-B2
An application key to access the bucket was then created. I set the name prefix to be the name of the state object, which was to be opentofu-state-kubernetes.
[lyuk98@framework:~]$ backblaze-b2 key create \
  --bucket opentofu-state-kubernetes \
  --name-prefix opentofu-state-kubernetes \
  opentofu-state-kubernetes \
  deleteFiles,listBuckets,listFiles,readFiles,writeFiles
Preparing Cloudflare
During my previous attempts at configuring Kubernetes clusters, I did not want their endpoints to be reliant on a single node. Even though I only have one device for now and I will likely have to learn more upon the cluster’s expansion, I did not want to settle with what I know should eventually be changed later on.
Cloudflare, the DNS service I use for my domain, offers round-robin DNS, allowing multiple A and AAAA records for the same hostname. It is technically meant for load balancing, but what was important to me was that I no longer had to change the endpoint in case of changes in control plane nodes.
I simply had to let OpenTofu manage some DNS records. To grant such a capability, I went to the Cloudflare dashboard and added an API token, just like what I did before.
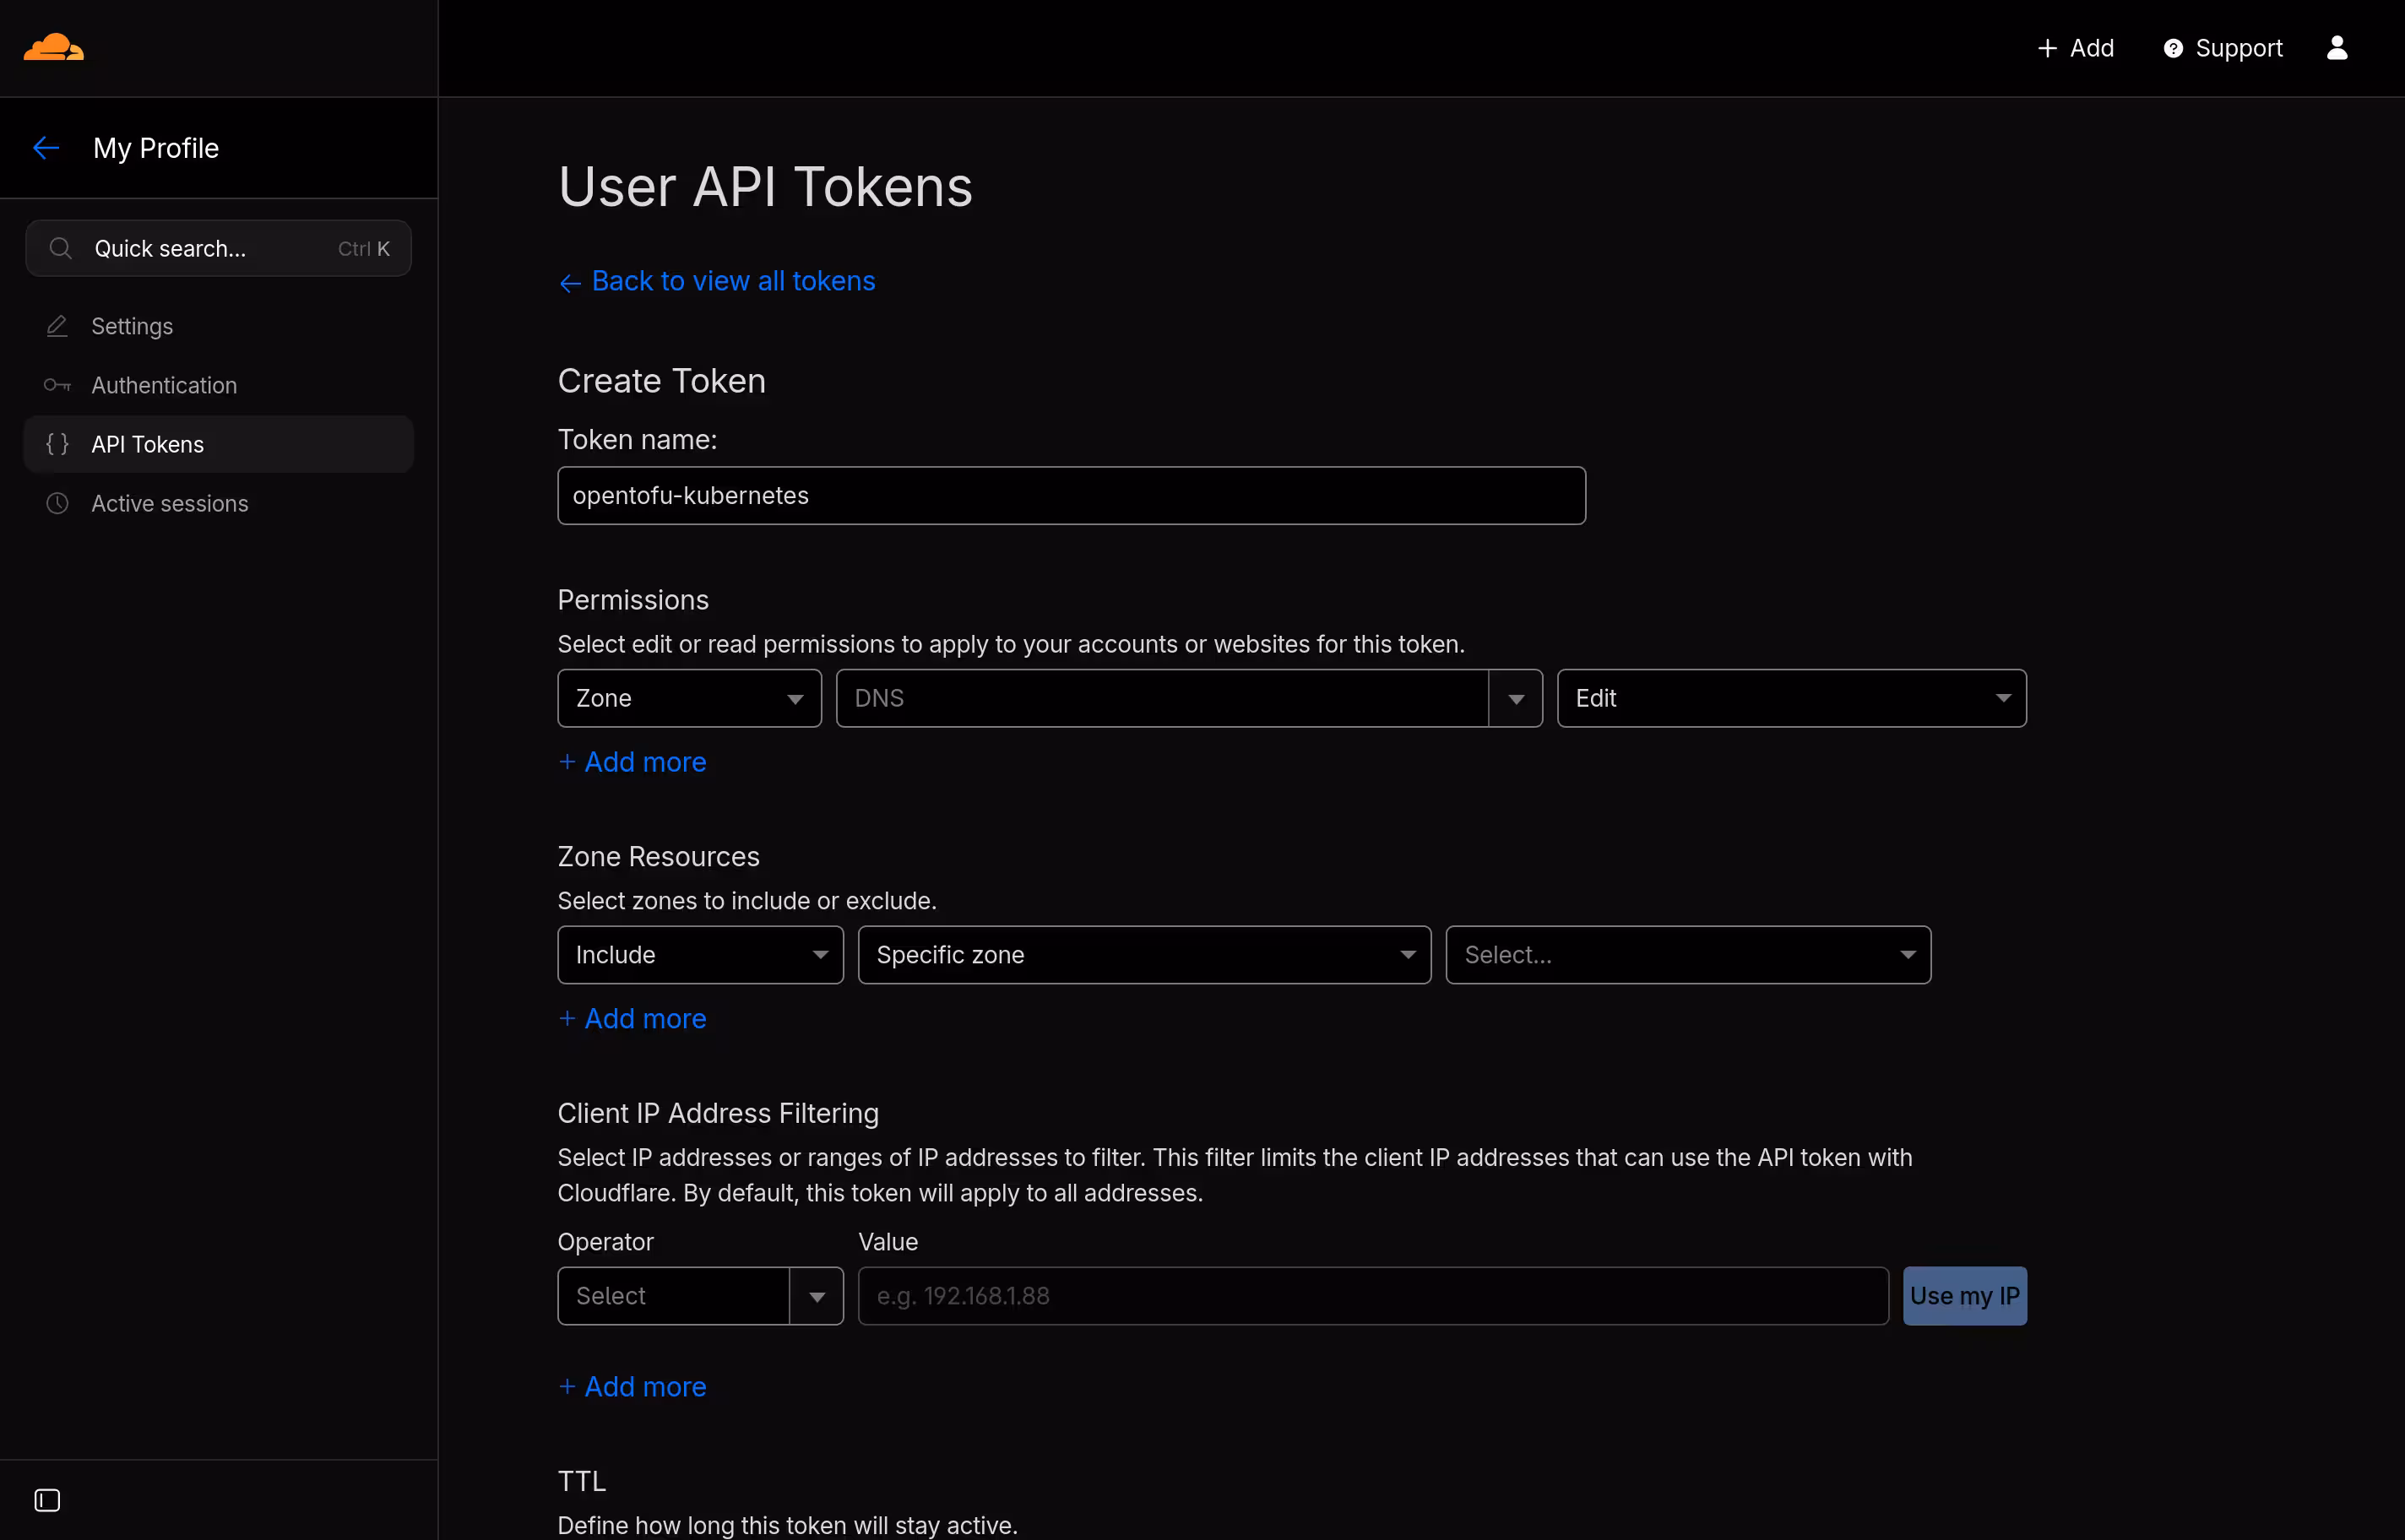
Writing configurations
The next step was to configure the infrastructure, which I started by creating a new repository.
Backend and provider configurations
I started from the file main.tf, configuring the state backend and encryption.
terraform {
  # State backend
  backend "s3" {
    skip_credentials_validation = true
    skip_metadata_api_check     = true
    skip_region_validation      = true
    skip_requesting_account_id  = true
    region                      = "us-west-002"

    key = "opentofu-state-kubernetes"
  }

  # State encryption
  encryption {
    # Key provider
    key_provider "pbkdf2" "key_provider_pbkdf2" {
      passphrase = var.state_passphrase
    }

    # Encryption method
    method "aes_gcm" "method_aes_gcm" {
      keys = key_provider.pbkdf2.key_provider_pbkdf2
    }

    state {
      # State data encryption method
      method = method.aes_gcm.method_aes_gcm

      # Enforce state encryption
      enforced = true
    }

    plan {
      # Plan data encryption method
      method = method.aes_gcm.method_aes_gcm

      # Enforce plan encryption
      enforced = true
    }
  }
}
Some skips in the backend configuration had to be made, since its support for any S3-compatible service other than Amazon’s was made on a best-effort basis, and I was using Backblaze B2.
The passphrase for state and plan encryption was to be provided via an input variable, which I defined at variables.tf.
variable "state_passphrase" {
  type        = string
  description = "Passphrase for state and plan encryption"
  sensitive   = true
  nullable    = false
}
required_providers were specified next. provider blocks of some generic providers were then placed at the end of main.tf.
terraform {
  # State configuration

  required_providers {
    cloudflare = {
      source  = "cloudflare/cloudflare"
      version = "~> 5.17"
    }
    helm = {
      source  = "hashicorp/helm"
      version = "~> 3.1"
    }
    local = {
      source  = "hashicorp/local"
      version = "~> 2.7"
    }
    random = {
      source  = "hashicorp/random"
      version = "~> 3.8"
    }
    tailscale = {
      source  = "tailscale/tailscale"
      version = "~> 0.27"
    }
    talos = {
      source  = "siderolabs/talos"
      version = "~> 0.10"
    }
    time = {
      source  = "hashicorp/time"
      version = "~> 0.13"
    }
  }
}

# Local resource management
provider "local" {}

# Random value generation
provider "random" {}

# Management of time-based resources
provider "time" {}
Tailscale
For both the nodes and the Kubernetes operator to be given their auth keys, OAuth credentials were set to be created.
provider "tailscale" {
  scopes = ["devices:core", "auth_keys", "oauth_keys", "services"]
}

# OAuth client for Tailscale Kubernetes Operator
resource "tailscale_oauth_client" "kubernetes_operator" {
  scopes      = ["devices:core", "auth_keys", "services"]
  description = "k8s-operator"
  tags        = ["tag:k8s-operator"]
}

# OAuth client for node (XPS 13)
resource "tailscale_oauth_client" "xps13" {
  scopes      = ["auth_keys"]
  description = local.hostnames.control_plane.xps13
  tags        = ["tag:k8s-control-plane", "tag:k8s-worker"]
}
Because I had to use control plane nodes’ tailnet IP addresses to create DNS records, I used Tailscale provider’s data source to wait for them to join the tailnet. depends_on was used, so that the data source only has to start waiting after when the required resources are provisioned.
# Tailnet device information (Kubernetes Operator)
data "tailscale_device" "kubernetes_operator" {
  depends_on = [helm_release.tailscale_operator]
  hostname   = "tailscale-operator"
  wait_for   = "5m"
}

# Tailnet device information (XPS 13)
data "tailscale_device" "xps13" {
  depends_on = [talos_machine_configuration_apply.xps13]
  hostname   = local.hostnames.control_plane.xps13
  wait_for   = "10m"
}
The resource each data source depends_on will be mentioned later.
Talos Linux
Cluster-wide resources
First, machine secrets were set to be generated. Looking at the number of resources and data sources that depend on this single resource in my completed code (which was 5 in total), it sure looked like one of the most important pieces of information.
provider "talos" {}

# Generate machine secrets for the cluster
resource "talos_machine_secrets" "kubernetes" {}
More input variables were then defined at variables.tf to be used later.
variable "talos_version" {
  type        = string
  description = "Version of Talos Linux"
  default     = "v1.12.4"
  nullable    = false
}

variable "kubernetes_version" {
  type        = string
  description = "Version of Kubernetes to use with Talos Linux"
  default     = "v1.35.1"
  nullable    = false
}

variable "node_xps13" {
  type        = string
  description = "Node address (XPS 13)"
  default     = "xps13"
}
Due to my wish to reduce redundancy, some commonly-used data was set as locals. The data I referred to set cluster_endpoint will be mentioned later, when I discuss provisioning Cloudflare resources.
locals {
  # The cluster name
  cluster_name = "kubernetes"

  # The cluster endpoint
  cluster_endpoint = "https://${local.cluster_subdomain}.${data.cloudflare_zone.default.name}:6443"

  # Hostnames
  hostnames = {
    control_plane = {
      xps13 = "xps13"
    }
    worker = {
      xps13 = "xps13"
    }
  }
}
Some partial machine configurations that are to be applied to all nodes in my cluster were defined as locals at talos-patches-common.tf. Following my habit (while writing NixOS configurations) of making separate files for different functions, I tried to achieve something similar, which ended up like the following.
locals {
  # Patches for all nodes in the cluster
  talos_patches_common = {
    # Enable IP forwarding
    ip_forwarding = {
      machine = {
        sysctls = {
          "net.ipv4.ip_forward"          = "1"
          "net.ipv6.conf.all.forwarding" = "1"
        }
      }
    }

    # Allow Kubernetes workloads to use swap memory
    kubelet_swap = {
      machine = {
        kubelet = {
          extraConfig = {
            memorySwap = {
              swapBehavior = "LimitedSwap"
            }
          }
        }
      }
    }

    # KubeSpan configuration
    kubeswap = {
      machine = {
        network = {
          kubespan = {
            # Enable KubeSpan
            enabled = true
          }
        }
      }
      cluster = {
        discovery = {
          enabled = true
          # Registries used for cluster member discovery
          registries = {
            # Kubernetes registry is problematic with KubeSpan
            # if the control plane endpoint is routeable itself via KubeSpan
            kubernetes = {
              disabled = true
            }
            service = {}
          }
        }
      }
    }

    # DNS resolver configuration
    resolver = {
      apiVersion = "v1alpha1"
      kind       = "ResolverConfig"

      # List of nameservers for domain name resolution
      nameservers = [
        { address = "100.100.100.100" },
        { address = "1.1.1.1" },
        { address = "8.8.8.8" },
        { address = "9.9.9.9" },
        { address = "1.0.0.1" },
        { address = "8.8.4.4" },
        { address = "149.112.112.112" },
        { address = "2606:4700:4700::1111" },
        { address = "2001:4860:4860::8888" },
        { address = "2620:fe::fe" },
        { address = "2606:4700:4700::1001" },
        { address = "2001:4860:4860::8844" },
        { address = "2620:fe::9" }
      ]
    }

    # Enable zswap
    zswap = {
      apiVersion = "v1alpha1"
      kind       = "ZswapConfig"

      # Use up to 30% of memory for zswap
      maxPoolPercent = 30

      # Allow kernel to move pages from zswap to swap
      shrinkerEnabled = true
    }
  }
}
Control plane-specific resources
Configuration for control plane nodes was first defined as locals.
locals {
  # Patches for control plane nodes
  talos_patches_controlplane = {
    # Disable default CNI (Flannel) in favour of Cilium
    disable_cni = {
      cluster = {
        network = {
          cni = {
            name = "none"
          }
        }
      }
    }

    # Allow running workload on control plane nodes
    run_workload = {
      cluster = {
        allowSchedulingOnControlPlanes = true
      }
    }

    # Define cluster subnets
    subnets = {
      cluster = {
        network = {
          podSubnets     = ["10.244.0.0/16", "fd00:10:244::/56"]
          serviceSubnets = ["10.96.0.0/12", "fd00:10:96::/112"]
        }
      }
    }
  }
}
The talos_machine_configuration data source for control plane nodes was created afterwards, with previously-defined patches being accessed for config_patches. Because the local variables are maps of maps (or objects of objects), their values were yamlencoded within for expressions.
# Machine configuration for control plane nodes
data "talos_machine_configuration" "controlplane" {
  cluster_endpoint = local.cluster_endpoint
  cluster_name     = local.cluster_name
  machine_secrets  = talos_machine_secrets.kubernetes.machine_secrets
  machine_type     = "controlplane"

  kubernetes_version = var.kubernetes_version
  talos_version      = var.talos_version

  config_patches = concat(
    [for patch in values(local.talos_patches_common) : yamlencode(patch)],
    [for patch in values(local.talos_patches_controlplane) : yamlencode(patch)]
  )
}
Host-specific resources
What followed was the configuration of the system that would run on the laptop. Before defining resources for installation, I created randomly-generated password and schematic of Talos Linux artifacts from Image Factory.
# Random password for disk encryption
resource "random_password" "talos_encryption_passphrase_xps13" {
  length = 64
}

# Image Factory schematic
resource "talos_image_factory_schematic" "xps13" {
  schematic = yamlencode({
    customization = {
      # extraKernelArgs = [
      #   # Disable display output
      #   "video=eDP-1:d"
      # ]

      systemExtensions = {
        officialExtensions = [
          "siderolabs/i915",
          "siderolabs/intel-ucode",
          "siderolabs/tailscale"
        ]
      }
      bootloader = "sd-boot"
    }
  })
}

# Host-specific Talos Linux image
data "talos_image_factory_urls" "xps13" {
  schematic_id  = talos_image_factory_schematic.xps13.id
  talos_version = var.talos_version
  architecture  = "amd64"
  platform      = "metal"
}
During the first deployment, I decided not to include extraKernelArgs to better troubleshoot any problem that may arise during the cluster’s operation.
A bunch of host-specific configuration was then defined as locals.
locals {
  # Commonly used volume encryption configuration for this host
  talos_encryption_xps13 = {
    provider = "luks2"
    keys = [
      # Encryption with static passphrase
      {
        slot = 0
        static = {
          passphrase = random_password.talos_encryption_passphrase_xps13.result
        }

        # Lock decryption key to the STATE partition
        lockToState = true
      }
    ]
  }

  # Patches specific to this node
  talos_patches_xps13 = {
    # Set hostname
    hostname = {
      apiVersion = "v1alpha1"
      kind       = "HostnameConfig"
      auto       = "off"
      hostname   = local.hostnames.control_plane.xps13
    }

    # Installation specification
    install = {
      machine = {
        install = {
          disk  = "/dev/nvme0n1"
          image = data.talos_image_factory_urls.xps13.urls.installer_secureboot
          wipe  = true
        }
      }
    }

    # Tailscale extension configuration
    tailscale = {
      apiVersion = "v1alpha1"
      kind       = "ExtensionServiceConfig"
      name       = "tailscale"

      # Add environment variables
      environment = [
        "TS_AUTHKEY=${tailscale_oauth_client.xps13.key}",
        "TS_HOSTNAME=${local.hostnames.control_plane.xps13}",
        "TS_ROUTES=${
          join(
            ",",
            concat(
              local.talos_patches_controlplane.subnets.cluster.network.podSubnets,
              local.talos_patches_controlplane.subnets.cluster.network.podSubnets
            )
          )
        }",
        "TS_EXTRA_ARGS=--advertise-tags=${join(",", tailscale_oauth_client.xps13.tags)}"
      ]
    }

    # Volume configuration - ephemeral data storage
    volume_ephemeral = {
      apiVersion = "v1alpha1"
      kind       = "VolumeConfig"
      name       = "EPHEMERAL"

      provisioning = {
        diskSelector = {
          match = "disk.transport == \"nvme\""
        }
        grow    = true
        minSize = "16GiB"
        maxSize = "220GiB"
      }

      encryption = local.talos_encryption_xps13
    }

    # Volume configuration - system state storage
    volume_state = {
      apiVersion = "v1alpha1"
      kind       = "VolumeConfig"
      name       = "STATE"

      encryption = {
        provider = "luks2"
        keys = [
          # Automatic decryption with TPM
          {
            slot = 0
            tpm  = {}
          },
          # Encryption with key derived from the node UUID
          {
            slot   = 1
            nodeID = {}
          }
        ]
      }
    }

    # Volume configuration - swap volume
    volume_swap = {
      apiVersion = "v1alpha1"
      kind       = "SwapVolumeConfig"
      name       = "swap"

      provisioning = {
        diskSelector = {
          match = "disk.transport == \"nvme\""
        }
        minSize = "4GiB"
        maxSize = "16GiB"
      }
    }
  }
}
The installation and bootstrapping process was to be performed next. Because bootstrapping had to be done after the installation of the operating system, the talos_machine_bootstrap resource was manually replace_triggered_by the talos_machine_configuration_apply resource.
# Apply machine configuration (XPS 13)
resource "talos_machine_configuration_apply" "xps13" {
  client_configuration        = talos_machine_secrets.kubernetes.client_configuration
  machine_configuration_input = data.talos_machine_configuration.controlplane.machine_configuration
  node                        = var.node_xps13

  config_patches = [for patch in values(local.talos_patches_xps13) : yamlencode(patch)]
}

# Bootstrap node (XPS 13)
resource "talos_machine_bootstrap" "xps13" {
  depends_on = [data.tailscale_device.xps13]
  lifecycle {
    replace_triggered_by = [talos_machine_configuration_apply.xps13.id]
  }

  client_configuration = talos_machine_secrets.kubernetes.client_configuration
  node                 = local.hostnames.control_plane.xps13
}
Back to cluster-wide resources
When the nodes are ready, client configuration for Talos Linux (which I will call talosconfig) and kubeconfig are to be created.
# Generate client configuration for the Talos Linux cluster
data "talos_client_configuration" "kubernetes" {
  client_configuration = talos_machine_secrets.kubernetes.client_configuration
  cluster_name         = local.cluster_name
  endpoints            = local.node_addresses.ipv4

  nodes = distinct(
    concat(values(local.hostnames.control_plane), values(local.hostnames.worker))
  )
}

# Generate kubeconfig for the cluster
resource "talos_cluster_kubeconfig" "kubernetes" {
  depends_on = [terraform_data.dns_ready]
  lifecycle {
    replace_triggered_by = [talos_machine_secrets.kubernetes.client_configuration]
  }

  client_configuration = talos_machine_secrets.kubernetes.client_configuration
  node                 = local.node_addresses.ipv4[0]
}
(The creation of kubeconfig, however, technically happens after the DNS records, which I will mention later.)
They would then be written to each file using the local_sensitive_file resource; if I were to manually access the cluster using either talosctl or kubectl, I would be able to use either of the following files.
# Write client configuration to file
resource "local_sensitive_file" "talosconfig" {
  filename = "${path.module}/talosconfig"
  content  = data.talos_client_configuration.kubernetes.talos_config
}

# Write kubeconfig to file
resource "local_sensitive_file" "kubeconfig" {
  filename = "${path.module}/kubeconfig"
  content  = talos_cluster_kubeconfig.kubernetes.kubeconfig_raw
}
Cloudflare
Before everything, I first had to specify the Cloudflare zone I will deploy DNS records to. Like when I deployed the Ente service, I declared a variable accepting the zone ID.
variable "cloudflare_zone_id" {
  type        = string
  description = "Cloudflare zone ID"
  sensitive   = true
  nullable    = false
}
A data source for the zone was then defined.
provider "cloudflare" {}

# Cloudflare Zone information
data "cloudflare_zone" "default" {
  zone_id = var.cloudflare_zone_id
}
Based on some data defined as locals, A and AAAA records were added next.
locals {
  # Subdomain of control plane nodes
  cluster_subdomain = "kubernetes.clusters.tailnet"

  # IP addresses of control plane nodes
  node_addresses = {
    ipv4 = [
      cloudflare_dns_record.xps13_a.content
    ]
    ipv6 = [
      cloudflare_dns_record.xps13_aaaa.content
    ]
  }
}

# Round-robin DNS records for control plane nodes

# A record (XPS 13)
resource "cloudflare_dns_record" "xps13_a" {
  name    = local.cluster_subdomain
  ttl     = 1
  type    = "A"
  zone_id = data.cloudflare_zone.default.zone_id

  content = data.tailscale_device.xps13.addresses[0]
  proxied = false
}

# AAAA record (XPS 13)
resource "cloudflare_dns_record" "xps13_aaaa" {
  name    = local.cluster_subdomain
  ttl     = 1
  type    = "AAAA"
  zone_id = data.cloudflare_zone.default.zone_id

  content = data.tailscale_device.xps13.addresses[1]
  proxied = false
}
Waiting for DNS propagation
The provisioning process accesses the cluster using the previously-defined domain name. It was a problem, however; DNS record updates take a while to propagate, and immediately moving on to the next step would result in referring to nonexistent or outdated records.
I added two resources to solve this problem: one for just waiting, and another for actually checking if the changes took place.
Although not an absolute must, I wanted to make my work cross-platform in general; for this, I decided to write a small script for checking the records in Python, which was made executable.
[nix-shell:~/opentofu-kubernetes]$ chmod +x scripts/check_dns.py
Because I made the script accept environment variables, I let OpenTofu pass necessary data that way as well.
# Wait for DNS propagation
resource "time_sleep" "dns_ready" {
  create_duration = "210s"

  triggers = {
    ipv4 = jsonencode(local.node_addresses.ipv4)
    ipv6 = jsonencode(local.node_addresses.ipv6)
  }
}

# Check for DNS propagation
resource "terraform_data" "dns_ready" {
  triggers_replace = [
    time_sleep.dns_ready.triggers.ipv4,
    time_sleep.dns_ready.triggers.ipv6
  ]

  provisioner "local-exec" {
    command = "${path.module}/scripts/check_dns.py"
    environment = {
      TEST_ADDRESS     = data.cloudflare_zone.default.name
      ADDRESS          = "${local.cluster_subdomain}.${data.cloudflare_zone.default.name}"
      DNS_RECORDS_A    = time_sleep.dns_ready.triggers.ipv4
      DNS_RECORDS_AAAA = time_sleep.dns_ready.triggers.ipv6
      INTERVAL         = "10"
      TIMEOUT          = "600"
    }
  }
}
Helm
To use the helm provider at all, some credentials need to be supplied. Thankfully, it can be done by referring to the talos_cluster_kubeconfig resource, which would be created after DNS records are updated.
provider "helm" {
  kubernetes = {
    host = local.cluster_endpoint

    client_certificate     = base64decode(talos_cluster_kubeconfig.kubernetes.kubernetes_client_configuration.client_certificate)
    client_key             = base64decode(talos_cluster_kubeconfig.kubernetes.kubernetes_client_configuration.client_key)
    cluster_ca_certificate = base64decode(talos_cluster_kubeconfig.kubernetes.kubernetes_client_configuration.ca_certificate)
  }
}
It was now time to install some charts. I started with Cilium, which would replace Flannel that is installed by default.
After following a guide by Sidero Labs, a resource for the chart was defined.
# Helm chart for Cilium
resource "helm_release" "cilium" {
  depends_on = [talos_cluster_kubeconfig.kubernetes]

  chart      = "cilium"
  name       = "cilium"
  repository = "https://helm.cilium.io/"

  atomic          = true
  cleanup_on_fail = true
  namespace       = "kube-system"

  set = [
    {
      name  = "ipam.mode"
      value = "kubernetes"
    },
    {
      name  = "kubeProxyReplacement"
      value = false
    },
    {
      name = "securityContext.capabilities.ciliumAgent"
      value = "{${
        join(
          ",",
          [
            "CHOWN",
            "KILL",
            "NET_ADMIN",
            "NET_RAW",
            "IPC_LOCK",
            "SYS_ADMIN",
            "SYS_RESOURCE",
            "DAC_OVERRIDE",
            "FOWNER",
            "SETGID",
            "SETUID"
          ]
        )
      }}"
    },
    {
      name = "securityContext.capabilities.cleanCiliumState"
      value = "{${
        join(
          ",",
          [
            "NET_ADMIN",
            "SYS_ADMIN",
            "SYS_RESOURCE"
          ]
        )
      }}"
    },
    {
      name  = "cgroup.autoMount.enabled"
      value = false
    },
    {
      name  = "cgroup.hostRoot"
      value = "/sys/fs/cgroup"
    }
  ]

  timeout = 600
}
The Tailscale Kubernetes Operator was next. Following a guide by Tailscale, another resource was created.
# Helm chart for Tailscale Kubernetes Operator
resource "helm_release" "tailscale_operator" {
  depends_on = [helm_release.cilium]

  chart      = "tailscale-operator"
  name       = "tailscale-operator"
  repository = "https://pkgs.tailscale.com/helmcharts"

  atomic           = true
  cleanup_on_fail  = true
  create_namespace = true
  namespace        = "tailscale"

  set = [
    {
      name  = "apiServerProxyConfig.mode"
      value = "true"
    }
  ]
  set_sensitive = [
    {
      name  = "oauth.clientId"
      value = tailscale_oauth_client.kubernetes_operator.id
    },
    {
      name  = "oauth.clientSecret"
      value = tailscale_oauth_client.kubernetes_operator.key
    }
  ]

  timeout = 600
}
Applying configurations
With the code ready, it was finally time to apply what I have written so far.
Preparing the host
I realised early on that Talos Linux does not support wireless networking; I purchased a USB-C Ethernet adapter as a result.
First, I went to Talos Linux Image Factory to grab an image. After closely following the specifications that I have written earlier, a schematic was made ready, and I downloaded the “SecureBoot ISO” from the provided link.
[lyuk98@framework:~]$ wget https://factory.talos.dev/image/878658d099efce07f00c03ee0e36627c074ac508866b36854300770b3ae7b3b9/v1.12.4/metal-amd64-secureboot.iso
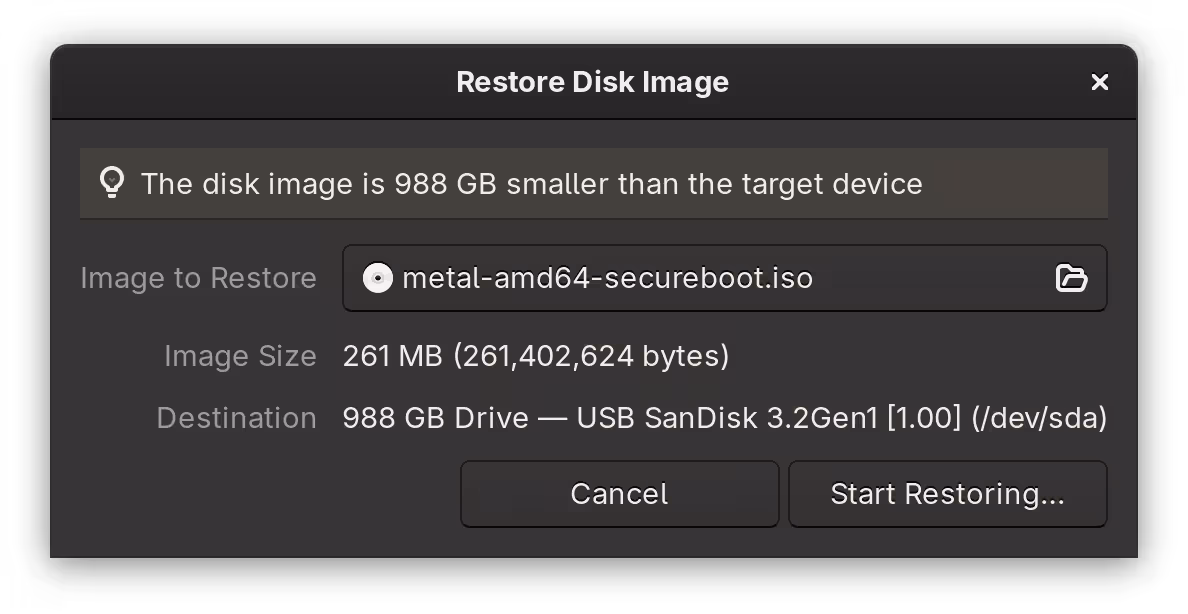
The image was then written to my USB storage device.
To let Talos Linux enrol its own Secure Boot keys, I put the device’s firmware into Setup Mode by erasing existing ones. I then booted into the installation media where, in the boot selection menu, I selected the Enroll Secure Boot keys: auto option.
When Secure Boot was ready, I booted into the installation media once again and picked an option that ended with (Reset system disk). The NixOS installation in the laptop was no more.
The device was then in maintenance mode, where I could now apply my OpenTofu configuration.
Running OpenTofu
Before initialisation, I prepared environment variables for tofu to use.
[lyuk98@framework:~/opentofu-kubernetes]$ nix-shell --pure
[nix-shell:~/opentofu-kubernetes]$ source ~/env.sh
The env.sh I wrote contained declarations of the following environment variables:
AWS_SECRET_ACCESS_KEY: the application key from Backblaze B2 to access the bucket withAWS_ACCESS_KEY_ID: the ID of the abovementioned application keyAWS_ENDPOINT_URL_S3: Backblaze B2’s S3 API endpointCLOUDFLARE_API_TOKEN: the API token for Cloudflare operationsTAILSCALE_OAUTH_CLIENT_SECRET: the OAuth credential used for deploymentTAILSCALE_OAUTH_CLIENT_ID: the ID of the abovementioned OAuth credential
On top of the above, the file also had input variables set as environment variables:
TF_VAR_state_passphrase: the passphrase used for encrypting and decrypting state and plan dataTF_VAR_cloudflare_zone_id: Cloudflare zone IDTF_VAR_node_xps13: address of the node; the only possible option, with the node in maintenance mode, was the internal IP address of my home network (such as192.168.0.2).
I then prepared another file backend.tfvars with just one line of backend configuration: the bucket name.
[nix-shell:~/opentofu-kubernetes]$ cat backend.tfvars
bucket = "opentofu-state-kubernetes"
With everything ready, I ran tofu init.
[nix-shell:~/opentofu-kubernetes]$ tofu init -backend-config=backend.tfvars
Just to be sure, I then ran tofu validate to see if I have made any mistakes.
[nix-shell:~/opentofu-kubernetes]$ tofu validate
Success! The configuration is valid.
It was then time to apply the configuration. First, a plan was created.
[nix-shell:~/opentofu-kubernetes]$ tofu plan -out=tfplan
The plan was then applied by running tofu apply.
[nix-shell:~/opentofu-kubernetes]$ tofu apply tfplan
The process took a while, which mostly consisted of waiting: for devices to come online, and for DNS records to be updated.
Post-installation configuration
Accessing the cluster
The cluster could now be accessed in two ways: via provisioned domain and using Tailscale’s API server proxy. The former option does serve a purpose, but whenever possible, I wanted to use the latter.
First, I let Tailscale generate the appropriate kubeconfig for my cluster.
[lyuk98@framework:~]$ tailscale configure kubeconfig tailscale-operator
There was no step two. I was now able to use kubectl.
[lyuk98@framework:~]$ kubectl cluster-info
Kubernetes control plane is running at https://tailscale-operator.[tailnet-address]
CoreDNS is running at https://tailscale-operator.[tailnet-address]/api/v1/namespaces/kube-system/services/kube-dns:dns/proxy

To further debug and diagnose cluster problems, use 'kubectl cluster-info dump'.
Upgrading Talos Linux
Unfortunately, upgrading to a newer version of Talos Linux is currently not possible using the Talos provider. As a result, I had to manually upgrade nodes using talosctl.
The local_sensitive_file resource with talosconfig as its content could be used to connect to nodes. I first copied it to ~/.talos/config.
[lyuk98@framework:~]$ mkdir ~/.talos
[lyuk98@framework:~]$ cp ~/opentofu-kubernetes/talosconfig ~/.talos/config
With a new image from Image Factory, I then performed an upgrade using talosctl upgrade.
[lyuk98@framework:~]$ talosctl upgrade \
  --nodes xps13 \
  --image factory.talos.dev/metal-installer-secureboot/19bad511ec610d3ce5fe680fd34334e45621f0e90c7b2f621998647e7f5f5ef9:v1.12.4
(It was less of an upgrade, and more of adding a kernel parameter to disable the display.)
Conclusion
I ended up creating way more resources than I initially imagined, which was sometimes difficult to keep track of. To truly see the scale of what I have created, I ran tofu graph to generate a visual representation.
[nix-shell:~/opentofu-kubernetes]$ tofu graph | dot -Tsvg > ~/graph.svg

As I expected, it was (to me) quite a mess. To see what mattered to me, I wrote a graph by myself, containing only resources and data sources, using Mermaid.
  flowchart BT
  %% Entity declaration

  %% cloudflare.tf
  data.cloudflare_zone.default([data.cloudflare_zone.default])
  time_sleep.dns_ready
  terraform_data.dns_ready
  cloudflare_dns_record.xps13_a
  cloudflare_dns_record.xps13_aaaa

  %% helm.tf
  helm_release.cilium
  helm_release.tailscale_operator

  %% tailscale.tf
  tailscale_oauth_client.kubernetes_operator
  data.tailscale_device.kubernetes_operator([data.tailscale_device.kubernetes_operator])
  tailscale_oauth_client.xps13
  data.tailscale_device.xps13([data.tailscale_device.xps13])

  %% talos-controlplane.tf
  data.talos_machine_configuration.controlplane([data.talos_machine_configuration.controlplane])

  %% talos-xps13.tf
  talos_machine_configuration_apply.xps13
  talos_machine_bootstrap.xps13
  random_password.talos_encryption_passphrase_xps13
  talos_image_factory_schematic.xps13
  data.talos_image_factory_urls.xps13([data.talos_image_factory_urls.xps13])

  %% talos.tf
  talos_machine_secrets.kubernetes
  data.talos_cluster_health.kubernetes([data.talos_cluster_health.kubernetes])
  data.talos_client_configuration.kubernetes([data.talos_client_configuration.kubernetes])
  talos_cluster_kubeconfig.kubernetes
  local_sensitive_file.talosconfig
  local_sensitive_file.kubeconfig

  %% Relation declaration

  %% cloudflare.tf
  time_sleep.dns_ready-- content -->cloudflare_dns_record.xps13_a
  time_sleep.dns_ready-- content -->cloudflare_dns_record.xps13_aaaa
  terraform_data.dns_ready-- triggers_replace -->time_sleep.dns_ready
  cloudflare_dns_record.xps13_a-- addresses -->data.tailscale_device.xps13
  cloudflare_dns_record.xps13_aaaa-- addresses -->data.tailscale_device.xps13

  %% helm.tf
  helm_release.cilium-- depends_on -->talos_cluster_kubeconfig.kubernetes
  helm_release.tailscale_operator-- depends_on -->helm_release.cilium
  helm_release.tailscale_operator-- id -->tailscale_oauth_client.kubernetes_operator
  helm_release.tailscale_operator-- key -->tailscale_oauth_client.kubernetes_operator

  %% tailscale.tf
  data.tailscale_device.kubernetes_operator-- depends_on -->helm_release.tailscale_operator
  data.tailscale_device.xps13-- depends_on -->talos_machine_configuration_apply.xps13

  %% talos-controlplane.tf
  data.talos_machine_configuration.controlplane-- name -->data.cloudflare_zone.default
  data.talos_machine_configuration.controlplane-- machine_secrets -->talos_machine_secrets.kubernetes

  %% talos-xps13.tf
  talos_machine_configuration_apply.xps13-- client_configuration -->talos_machine_secrets.kubernetes
  talos_machine_configuration_apply.xps13-- machine_configuration -->data.talos_machine_configuration.controlplane
  talos_machine_configuration_apply.xps13-- urls -->data.talos_image_factory_urls.xps13
  talos_machine_configuration_apply.xps13-- key -->tailscale_oauth_client.xps13
  talos_machine_configuration_apply.xps13-- tags -->tailscale_oauth_client.xps13
  talos_machine_configuration_apply.xps13-- result -->random_password.talos_encryption_passphrase_xps13
  talos_machine_bootstrap.xps13-- depends_on -->data.tailscale_device.xps13
  talos_machine_bootstrap.xps13-- replace_triggered_by -->talos_machine_configuration_apply.xps13
  talos_machine_bootstrap.xps13-- client_configuration -->talos_machine_secrets.kubernetes
  data.talos_image_factory_urls.xps13-- id -->talos_image_factory_schematic.xps13

  %% talos.tf
  data.talos_cluster_health.kubernetes-- depends_on -->helm_release.tailscale_operator
  data.talos_cluster_health.kubernetes-- client_configuration -->talos_machine_secrets.kubernetes
  data.talos_cluster_health.kubernetes-- content -->cloudflare_dns_record.xps13_a
  data.talos_cluster_health.kubernetes-- content -->cloudflare_dns_record.xps13_aaaa
  data.talos_client_configuration.kubernetes-- client_configuration -->talos_machine_secrets.kubernetes
  data.talos_client_configuration.kubernetes-- content -->cloudflare_dns_record.xps13_a
  data.talos_client_configuration.kubernetes-- content -->cloudflare_dns_record.xps13_aaaa
  talos_cluster_kubeconfig.kubernetes-- depends_on -->terraform_data.dns_ready
  talos_cluster_kubeconfig.kubernetes-- replace_triggered_by -->talos_machine_secrets.kubernetes
  talos_cluster_kubeconfig.kubernetes-- client_configuration -->talos_machine_secrets.kubernetes
  talos_cluster_kubeconfig.kubernetes-- content -->cloudflare_dns_record.xps13_a
  talos_cluster_kubeconfig.kubernetes-- content -->cloudflare_dns_record.xps13_aaaa
  local_sensitive_file.talosconfig-- talos_config -->data.talos_client_configuration.kubernetes
  local_sensitive_file.kubeconfig-- kubeconfig_raw -->talos_cluster_kubeconfig.kubernetes
This project undertook some major changes before becoming what it is now. Because my desired setup was quite uncommon, I sometimes had to modify and adapt people’s solutions online to fit my specific setup.
It was exhausting at times, and I got worried about no longer being able to commit to it (with life getting in the way), but I am happy to be able to achieve my goal without giving up my desire of building declarative systems.
The next step for me, with the Kubernetes cluster now in operation, would be to finally migrate my existing self-hosted services to the container orchestration system. I do not plan to take the easy way, though; even if it means having to learn a lot more, I would like to do what I think is right.